Tuesday, October 22, 2013

Halloween Season

Children look extra adorable in costumes, so I've been looking forward to Halloween these last three years.

Whenever N has her hair in Double French Braids and a headband, which she often adds herself, 
DH call her "Poca" (short for Pocahontas). 

So this year it was his idea to add couple more components to her hairstyle,
and turn her into a real Pocahontas.


I gathered some feathers for her headband; added fringe to her shirt; and sewed a cute little tutu 
(gathering the tulle as recommended in this tutorial, LOVE the result!) with added fringe. 
Since it was a little chilly, I picked out this vest from the first week of PR&P
and was so happy it just fit into the whole outfit!


Initially, she was against painting on her face, but eventually she warmed up to the idea and let me draw a few lines on her cheeks.
She had a blast trick or treating in the Zoo!

Wednesday, October 2, 2013

Project Run & Play 2013: Season 7, Week 4

Challenge: Signature Look

I know exactly what I like to portray in my designs: effortlessness and simplicity with right amount of details. I like when the clothes draw your attention to the child, not the garment.
When you've breathed in all the beauty of the child, then you start noticing little details of the clothes, and the more you look the more elements you find.

Picture Day Dress


N has her first picture day at the preschool, so I've decided this is the dress she'll wear. 
These gorgeous lavender-pink and blue-gray cotton fabrics are from man's shirts. (I find softest and highest quality cottons in the men's departments, not my local fabric shops).  These fabrics have just the right weight to form a beautiful A-line silhouette. 


I've had this design in my head for couple of months. I had sketched it many times, but wasn't sure how I'd achieve what I wanted until I finally started cutting and attaching. I wanted pintucks on the bodice sides and I wanted those pintucks to transform into pleats on the skirt. The problem was that in my vision pintuck panels were in contrasting color and the bodice center and the skirt were a single piece (no seam at the waist).
I'm so happy I finally figured it out and was able to create this dress.
(I created this pattern based on the tunic pattern I drafted from scratch a few months ago).


In this close-up, you can see how pintucks turn into pleats. The seam lines are hidden underneath the tabs, which are finished off with beautiful metal buttons. I think the white lace highlights the contrast between two fabrics at the bodice.


More details include skinny peter pan collar, applique butterflies with embroidery and a fabric belt that ties into slim bow at the back.


These knee high socks (I've added little coordinating bows to store-bought socks) finishes up the look for a simple yet sophisticated and still playful dress for the big picture day.


For these chilly fall mornings, N needed a cardigan or a blazer... or a combination of both!

Cardilazer


I used a soft yet quite sturdy knit cotton in charcoal gray to create this "cardilazer" (we'll use this word for the lack of knowledge of more technical term for this garment). I drafted this pattern based on the similar blazer N has outgrown.


If you look close, you'll notice seam lines practically everywhere. I drafted 10 different pattern pieces to create this cardi. It has princess seams on the front as well as back. It has separate panels along the zipper. Each sleeve has three pieces plus attached cuffs. And the stand-up collar of course. 


 Each exposed seam has two rows of double-needle stitching. I used an embroidery black thread for those stitches, but I wish I've tried more contrasting color to highlight these seams a bit more. 
Since the knit doesn't fray, I was able to expose these beautiful lines and not worry about fraying. 


To make this cardi a bit more playful, I added light pink zipper and pink embroidered flowers. 


This will keep N warm and comfortable. 
However, with this changing weather, you never know what to expect in October. 
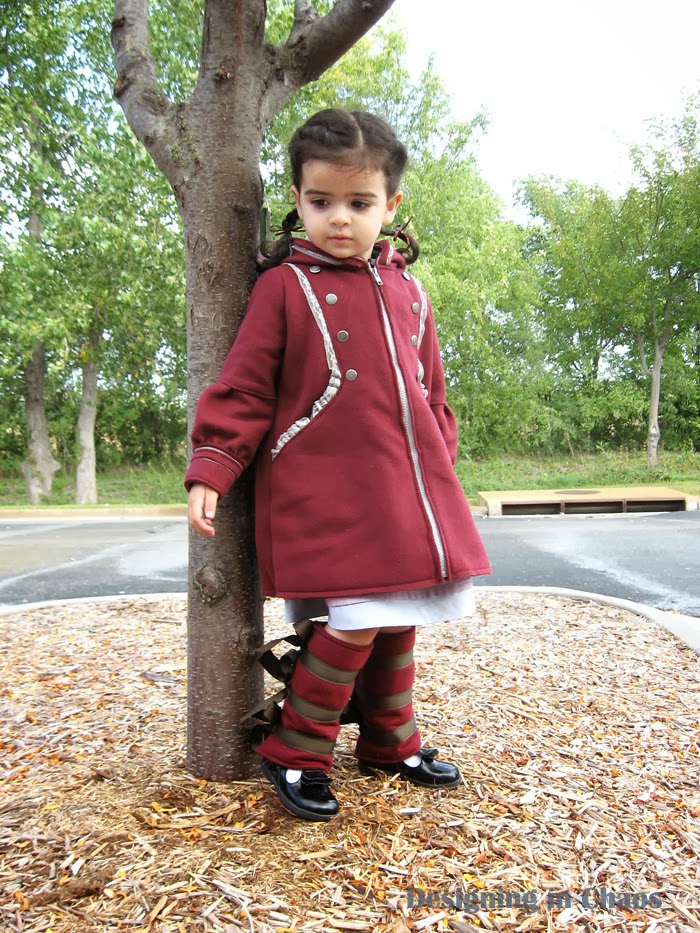
So.... in case of a really really cold day, I introduce you the fleece coat and leg warmers.

Coat & Legwarmers


Ok, ok, I'm sure N won't really need these next couple of weeks, but I needed to create the whole ensemble, this is PR&P after all! 


This is the coziest little coat ever! The fleece is so warm, yet light weight. It also doesn't fray. So I decided to use similar technique as in the cardi, and similar lines as in the dress (at least the front top part). 
I started with the Burda Magazine coat pattern, but totally changed it up, only keeping the general shape. 
 I cut up the sleeves into three parts, made the middle extra wide and gathered to achieve a fuller effect at the middle. And made the cuffs double layer for sturdiness. I also added lace+fleece trim to the cuffs.)


I also self-drafted the hood, added lace+ fleece trim to the edge and attached a simple flower, which is made of all the fabrics of the whole outfit. 


I love the design of the front. The military style lines at the bodice transform into wide pockets and are finished off with lace and metal buttons. I'm especially proud of the pockets, I thought this was a very smart design idea. 

But, let's not forget the back!


The original pattern had a back yoke and an inverted pleat in the center. I kept this design, but added this awesome bow. I've seen many designs and tutorials on dresses and shirts that have contrasting bows like this, and I love it. This is my twist on that idea. I think it was clever to change the direction of the pleat, it looks like it's part of the bow almost... (I was going to write that the pleat is now "out-verted", but then I googled it and, turns out, it's called a box pleat, who knew...).


I Love these legwarmers. I used this awesome tutorial and fleece leftovers from the coat. They'll keep her feet warm and cozy!


So, that's it.
N thinks this body form is the cutest thing ever and often plays with it. 
However, she didn't really want to share her new clothes with it, 
so that tells me she's happy with her new outfit. 


Sunday, September 15, 2013

Preschool Fall Collection {Part 1}

 My mission for preschool sewing was to create simple, comfortable clothes that didn't require too much energy or too precious materials to sew, but still represented my aesthetics.

Plaid Tunic

I love tunics for N. They can be paired with shorts in the hot weather and layered over long sleeve shirt and legging in the colder weather.


I used the plaid fabric in both directions: the top part is cut on bias & the bottom ruffle part - along the grain.
To add more interest, I attached a contrasting collar and a trim along the hem ruffles. 
I left the flutter sleeves and the hem edges raw with a bit of contrasting stitch.


But what I love the most about this tunic is its shape. I drafted this pattern myself based on a basic bodice, which I redraft with every new project in hopes of finding the best possible fit. In this little number, the hem is uneven but not because of the asymmetrical hemline. Rather, because of the difference in the height of the shoulder areas of the pattern. The back is longer giving the tunic this interesting silhouette. This pattern is one more experiment that turned out to be successful, so I've saved the pattern for future projects.


Grayish Blue & Plaid Reversible Pinafore

I love pinafores on little girls. I can't believe this is the first time I've attempted to sew one for N. 
I drafted this pattern myself inspired by many beautiful pinafores out there. 


My twist was to try to incorporate almost cap-like silhouette at the shoulder.
I love how this turned out. 


The plaid side paired with knee high socks looks like a uniform to me, which is so adorable on a three year old. 
In both photos N is wearing little bloomer-shorts I've made for her.


Thursday, September 12, 2013

Project Run & Play 2013: Season 7, Week 1

Challenge: Oliver + S Popover Dress Pattern Remix

Today is THE deadline and, of course, this is the day when I'm finally done with the outfit... I do still have to go through the photos and choose/edit/upload them... I started brainstorming ideas for this challenge weeks ago and thought I'd have everything done in advance, but having so much time turned out to be a curse...


After agonizing about million ideas that kept going through my mind, I created this ensemble. All three pieces are based on the Popover dress pattern. To me, the most memorable detail of this pattern is the simple yet beautiful yoke. So that's what I took and transformed this pattern into three distinct garments.

1. Gilet 


I've admired April Showers vests by Polder for long, and knew Popover Dress yoke would be a great pattern piece to achieve this look. I took a basic bodice and Popover dress yoke, overlapped them and made totally new pattern pieces. I followed Popover Dress pattern lines to create new armholes and the yoke. 

The rest I just improvised. I added batting in-between the main and lining fabrics and quilted the top part to accentuate the yoke, of course. 


I also quilted my daughter's initial N on the back. 


I added folded bias strips between the yoke and the bottom bodice. Finally, I added fluffy bows on the shoulders to mimic the Popover Dress strap ties. 

2. Tunic


I wanted a fall/winter tunic that could be worn by itself, with a shirt, with a cardigan and so forth, so here's what I came up with. Up until N tried it on this morning, I was still in doubts about every bit of this tunic (are the ruffles right? Is that collar too weird? Are those extended sides flattering?) 

When I saw it on my 3 year old, I fell in love.


In this garment, I simply widened the yoke and added shoulders/sleeves. For a little special detail, I created these extended sides on the bottom that hang and drape beautifully. I drafted a few different pieces for the collar and then played with them putting them in different combinations. This is what I settled on (it looks like origami , doesn't it?!)


The back has an invisible zipper for closure.


I'll make sure to save the final pattern I created based on (again) the Popover Dress  yoke piece and a basic bodice pattern.

3. Shorts


Yesterday, close to midnight, I thought I was done. But when I took another look at the outfit, I wasn't quite happy. The pinafore I had so excitedly designed, embroidered and sewed just didn't fit with the rest of the pieces. So I put it away. Luckily, a new idea popped into my mind; I realized I could use the same old yoke piece of Popover Dress to created the shorts! I've admired cute little bloomer shorts with button flaps at the front, and now I wanted to create one. So I did. 


 I started with a really nice shorts pattern by Burda Style (Kids 9491) and used the yoke piece (made it higher and skinnier, but left the lines untouched) to created this flap extension to the pockets. I added these military inspired beads instead of the buttons to make it a little more unexpected. I also changed up the stripes direction at the pockets for some interest. 


And that's it! I've not slept a minute last night, but this outfit is just so right for my daughter that I'm happy I kept following my instincts!